WordPress Installation

WordPress LogoWordPress is a CMS available as an opensource software. It is one of the famous and widly used content management systems. Primarily designed to be used as a Blogging system, it has now developed into a huge powerful tool with tons of plugins and themes which can give you functionality of a simple blog website to a e-commerce platform.

 In this post we are going to see the steps that are involved in installing WordPress either on you local machine or on a actual webserver.

Pre-requsites:

WordPress is primarily based on PHP and works with MySQL or MariaDB. So we will need these software ready on our system before hand

As of writing this post latest version of WordPress is 5.2.8. You can download it from here (Download WordPress). Note: That by the time you go the website the version might have been updated. If you are looking for a different version for some specific reasons, see this page (WordPress All Releases)

Software Requirements and Version:

  • PHP version 7.4 or greater
  • MySQL version 5.6 OR MariaDB version 10.1 or greater.
  • Apache WebServer  2.4+ (To be on safer side).
  • phpMyAdmin (optional, required if you do not know how to use the command line mysql utility)

This post assumes that the above softwares are already installed and configured.

Pre install steps:

  1. WordPress works with one database that needs to be created before hand. You can use either phpMyAdmin or the mysql command line interface to create a new user and a single database assigned to the same
    1. Never user 'root' and nopassword setup.  Make sure your mysql/mariadb root password is set to somthing strong.
    2. To create a new user and assign a database via mysql command line, connect to mysql/mariadb using the following command:
      1. mysql -u root -h localhost -p
      2. You will be prompted for the 'root' password, enter the same:
      3. On the mysql command prompt run the following query:
      4. Create a database:
        1. mysql> CREATE DATABASE mywpdb;
      5. Create a user with password:
        1. mysql> CREATE USER 'mywpuser'@'localhost' IDENTIFIED BY 'm@ki14$EEf';
      6. Grant database access to user created above:
        1. mysql> GRANT ALL ON mywpdb.* TO 'mywpuser'@'localhost';
      7. Keep a note of all the three things above, Username, Password and Host (localhost)
      8. mysql database and user creation
    3. Login with these credential and check if database is accesible.
      1. user login and check db
    4. If you see the datbase just created we are good to go.
  2. Download WordPress: most probably you have already downloaded it, if not download the compressed (tag.gz or zip) as per your requirement. (Download WordPress).
  3. Locate Document Root: Depending what OS you are using you will need to know your document root, this is where we will be extracting the WordPress files.
    1. In GNU/Linux running apache it could be:
      1. /var/www/html 
    2. For XXAMP/WAMP under other OS please check there documentation [ TBA ]
    3. Once done uuncompress the downloaded wordpress file in the document root directory. (You may want to keep it in some sub folder, but in reality WordPress would be the main CMS running your site, so make sure to first move all the files to the actual Document Root and not in a sub folder.
  4. Start installation: Open A browser and in address bar type:
    1. http://localhost  (if files are copied directly into Document Root)
    2. http://localhost/wordpress  (or whatever is the sub directory name, if installed in a sub directory)
    3. First page
    4. Click Let's Go
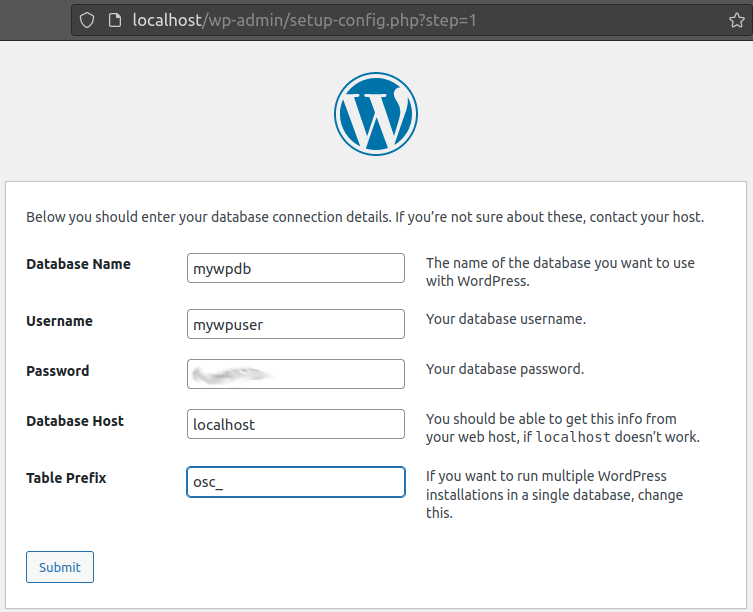
    5. Provide database and user information (The one which you created in previous steps)
    6. DB info
    7. Creating wp-config.php (If directory is not writable). If there are permission issues you could see this page:
      1. Simply copy the code  in a text editor and save it at wp-config.php in your document root or where ever you copied WordPress. (You will see a wp-config-sample.php here)
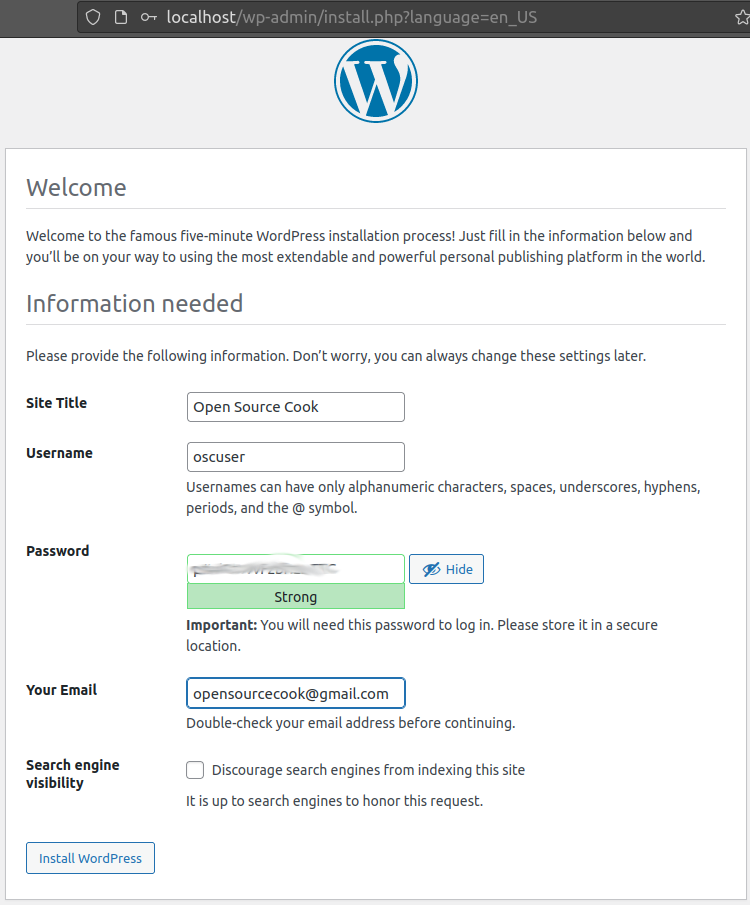
    8. Setup up Site Name and admin user (with password). In a live server make sure to give a proper email id, it is used for recovering password and getting update information.
    9. Site details and user setup
    10. Click "Install WordPress" to finalize your setup.
    11. You should see the final message, telling you that WordPress is now installled.
    12. Final message
    13. Click Login to be redirected to login page.
    14. login page
    15. Once logged in you will be redirected to Admin Panel, from where you can manage you site.
    16. Admin Page
    17. From here you can either point you browser to http://localhost or Click the home icon to visit you site.
    18. Sites First Page

Thats it, you wordpress in now installed. Enjoy.


  • Check out the following video for demo:


Add new comment

Filtered HTML

  • Web page addresses and email addresses turn into links automatically.
  • Allowed HTML tags: <a href hreflang> <em> <strong> <cite> <blockquote cite> <code> <ul type> <ol start type> <li> <dl> <dt> <dd>
  • Lines and paragraphs break automatically.
CAPTCHA
Enter the characters shown in the image.
Are you a robot?
Address

OpenSourceCook.in
"Natraj"  Bungalow,
Colony No.7,  Sr.No. 38.
(Lane Behind Sai Baba Mandir)
Kale Borate Nagar, Hadapsar,
Pune - 411028.
Get Directions